Why Every Content Creator Needs a DSLR Shoulder Rig
The difference between amateur and professional video often comes down to one factor: stability. A DSLR shoulder rig transforms your camera from a handheld device into a stabilization platform that delivers smooth, intentional movement instead of distracting shake. For content creators building an audience on YouTube, Instagram, or TikTok, this matters more than ever—viewers scroll past shaky footage within seconds, but cinematic quality keeps them watching. Beyond aesthetics, a shoulder rig solves a critical workflow problem by creating a permanent mounting system for your essential accessories. Instead of juggling a separate microphone, monitor, and light while trying to hold your camera steady, everything locks into one cohesive unit that moves with you. This modular approach means you can configure your setup once and shoot confidently for hours without constant readjustment. The creative control extends to shot variety too—smooth tracking shots, controlled pans, and stable low-angle work become effortless when your camera is properly supported. While the initial investment might seem significant, consider the value equation: a rig elevates every frame you capture, making your content immediately more watchable and shareable, which directly translates to better engagement and growth across all platforms.
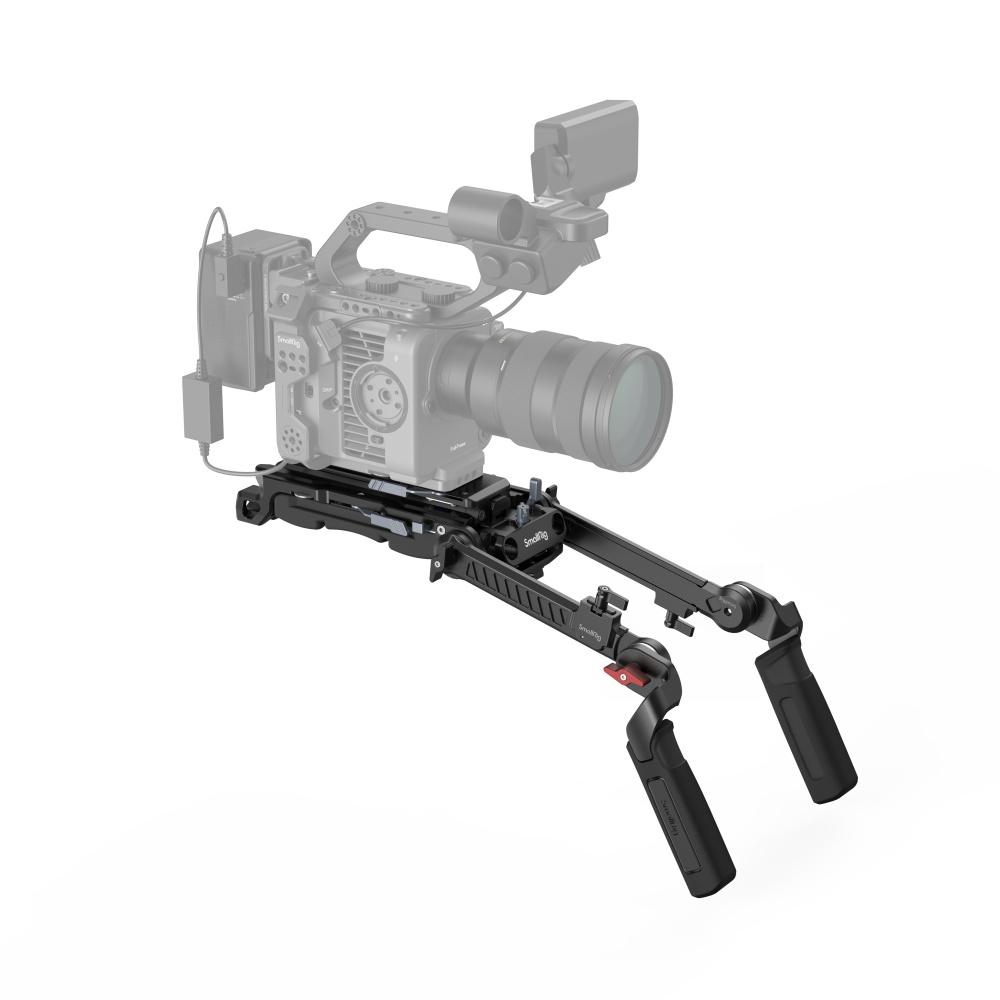
Building Your Foundation: The Camera Cage and 15mm Rod System
Every stable rig starts with a camera cage—a protective frame that wraps around your DSLR and transforms it from a standalone device into a modular platform. The cage serves three critical functions: it shields your camera from bumps and drops during active shooting, provides multiple mounting points for accessories through threaded holes and cold shoes, and creates the connection interface for the rod system that forms your rig’s structural backbone. Choosing a cage means finding one specifically designed for your camera model, ensuring cutouts align perfectly with your battery door, card slots, and ports without blocking access. Once your cage is secured, the 15mm rod system becomes your rig’s skeleton—two parallel rods that extend forward from the cage, creating a rigid rail for mounting everything from follow focus units to matte boxes. The connection between cage and rods happens through 15mm rod clamps, small but crucial components that lock onto your cage’s baseplate and grip the rods with enough force to prevent any rotation or slippage during movement. To assemble this foundation, start by attaching your camera to the cage using the 1/4″-20 screw on the cage’s base, tightening until secure but not over-torqued. Next, mount the rod clamps to the cage’s baseplate—most cages have pre-drilled holes positioned for standard 60mm rod spacing. Slide your 15mm rods through both clamps, ensuring they extend forward evenly, then tighten each clamp’s locking mechanism in a cross-pattern to distribute pressure and prevent the rods from twisting under load. Check rigidity by gently applying pressure to the rod ends—there should be zero flex or movement at the connection point, creating a rock-solid platform ready for the components that follow.
Choosing the Right Cage and Rods for Your Kit
Material choice impacts both durability and shooting comfort—aluminum cages offer excellent strength at a budget-friendly price point and can withstand years of professional use, while carbon fiber options reduce weight significantly for run-and-gun scenarios where every ounce matters during extended handheld work. Prioritize cages with abundant mounting options: look for multiple 1/4″-20 and 3/8″-16 threaded holes on the top, sides, and back, plus cold shoe mounts for quick-attach accessories like microphones or small LED lights. Manufacturers like SmallRig offer camera-specific cages with precision-engineered cutouts for popular DSLR models, ensuring you maintain full access to ports and controls while adding extensive mounting capabilities. Rod length determines your rig’s expandability—shorter 10-inch rods work for minimal setups with just a follow focus, while 12 to 15-inch rods accommodate full configurations including matte boxes and lens support systems, giving you room to grow as your production needs evolve.
Core Components for Comfort and Control
A functional cage and rod system means nothing if you can’t hold the rig comfortably for more than five minutes. The shoulder pad transforms your rig from a front-heavy burden into a balanced extension of your body, distributing weight across your shoulder and collarbone instead of forcing your arms to bear the entire load. A quality camera shoulder pad features dense foam padding that cushions without compressing flat after repeated use, a textured or rubberized surface that grips your clothing to prevent sliding during movement, and an adjustable mounting angle that lets you tilt the pad to match your natural shoulder contour. When properly positioned, the pad creates a stable platform that lets you shoot handheld for hours without the burning fatigue that comes from supporting everything with your grip alone. Handles complete the control equation by giving you precise points of contact for steering and stabilizing your shots—a top handle mounted directly above the camera provides vertical support and makes low-angle shots manageable, while front handles attached to the rods give you leverage for smooth pans and the ability to pull the rig tight against your body for maximum stability. Integrating a follow focus system elevates your control further by mounting a geared wheel to your rods that connects to your lens, allowing smooth, repeatable focus pulls without touching the lens itself and introducing shake. An external monitor mounted on top or to the side solves the critical problem of accurate framing and focus confirmation—your camera’s small LCD becomes nearly useless in bright sunlight and forces you into awkward neck positions, while a larger monitor with focus peaking and exposure tools lets you work confidently in any lighting condition and maintain proper shooting posture that prevents neck and back strain during extended sessions.
Ergonomics in Action: Positioning Your Shoulder Pad and Handles
Start by sliding your shoulder pad along the rods until the camera’s center of gravity sits directly above your shoulder—test this by lifting the rig and noting where it naturally wants to balance, then lock the pad at that point using the rod clamps. The pad angle should match your shoulder’s natural slope, typically requiring a slight forward tilt so the front edge sits flush against your collarbone while the rear provides upward support. For handles, mount your top handle so your grip falls naturally when your arm hangs relaxed at your side, avoiding the common mistake of positioning it too far forward which forces your wrist into an uncomfortable bent angle. Front handles work best when placed where your forward hand can grip comfortably while your elbow maintains a roughly ninety-degree bend, creating a stable triangle between your shoulder, rear grip, and front support that absorbs movement and keeps the camera level during walking shots.
Simplifying Your Setup: The Value of Cage to Shoulder Rig Kits
For content creators overwhelmed by component compatibility and scattered purchases, cage to shoulder rig kits offer an immediate solution—pre-configured bundles that include everything from the camera cage to the shoulder pad in one box. These kits eliminate the guesswork of matching rod diameters to clamp sizes or wondering if your chosen shoulder pad will actually fit your rod system, because every component is engineered to work together from the start. The cost advantage becomes clear when you compare buying items individually versus a bundled package—manufacturers typically offer kits at a lower total price than purchasing each piece separately, making professional-grade setups accessible even on tight budgets. The convenience factor matters just as much: one purchase, one delivery, one setup session, and you’re ready to shoot instead of waiting for multiple shipments or making return trips to the store for forgotten adapters. The tradeoff comes in customization—kits lock you into specific component choices that might not perfectly match your shooting style or future upgrade plans. When evaluating a kit, verify it includes the core essentials this guide has covered: a camera-specific cage with abundant mounting points, quality 15mm rods with secure clamps, a padded shoulder rest with adjustment capability, and at least one handle for control. Kits work best for creators just entering the shoulder rig world who need a functional baseline system immediately, or for those shooting standard documentary and interview content where the included configuration covers most scenarios without requiring specialized additions.
Step-by-Step Assembly: From Box to Balanced Rig
With all your components gathered, follow this logical sequence to build a functional rig without frustration. Step one: secure your camera to the cage using the 1/4″-20 screw on the cage’s base plate, ensuring the camera sits centered and all ports remain accessible—tighten firmly but avoid over-torquing which can strip threads or crack your camera body. Step two: attach the 15mm rod clamps to your cage’s base plate using the pre-drilled mounting holes, positioning them to maintain the standard 60mm spacing that ensures compatibility with accessories—finger-tighten the screws initially to allow minor adjustments. Step three: slide the 15mm rods through both clamps simultaneously, extending them forward evenly so each rod protrudes the same distance, then tighten the clamp screws in a cross-pattern to prevent rod rotation under load. Step four: position your shoulder pad on the rods at the point where your camera’s weight balances naturally over your shoulder, typically placing the pad’s center slightly behind the camera body, then lock it in place with its integrated clamps. Step five: mount your top handle directly above the camera using the cage’s top mounting holes, and attach front handles to the rods at a comfortable reach distance where your elbows bend naturally. Step six: add your external monitor to the top handle or cage side using a ball head mount for angle adjustment, route cables neatly along the rods using velcro straps, and attach your microphone to an available cold shoe or threaded mount. Step seven: lift the assembled rig and rest it on your shoulder—the camera should sit at eye level without forcing you to crane your neck, and the weight should distribute evenly without front-heavy tipping. Make final micro-adjustments to the shoulder pad position and handle angles, then tighten all clamps and screws one last time before your first shoot.
Pro Tips for Shooting with Your New Shoulder Rig
Building your rig is only half the equation—shooting effectively with it requires deliberate technique and body awareness. Start with your stance: feet shoulder-width apart, knees slightly bent to absorb movement, and your core engaged to create a stable base that prevents wobble from traveling up through your body into the camera. When executing pans, initiate the movement from your hips rather than twisting your upper body—this creates smoother, more controlled rotation and prevents the jerky starts and stops that come from arm-only movements. For walking shots, adopt a heel-to-toe roll with each step instead of flat-footed stomping, and keep your knees bent throughout the stride to act as natural shock absorbers that smooth out vertical bounce. Weight distribution becomes critical during extended shoots—shift the rig slightly forward or backward on your shoulder every twenty minutes to prevent fatigue from concentrating in one muscle group, and use your front handle to pull the rig tight against your body during intense sequences, creating a more rigid connection that enhances stability. Quick-release strategies save time when transitioning between shooting styles: mount a quick-release plate to your rig’s baseplate so you can instantly transfer to a tripod for static interviews, or keep a separate gimbal-compatible cage in your kit for moments requiring more dynamic movement than a shoulder rig can provide. For maintenance, wipe down your rods after dusty or wet shoots to prevent grit from damaging clamp threads, and periodically check all mounting screws for tightness since vibration during transport can loosen connections over time. When traveling, remove accessories and pack them separately to reduce stress on mounting points, and consider a padded case with custom foam cutouts that cradle your rig’s specific configuration, protecting your investment while keeping everything organized for rapid deployment on location.
Transform Your Content with Professional Stability
The path from shaky handheld footage to professional, cinematic video doesn’t require guesswork or endless trial and error—it starts with building a solid foundation using a camera cage and 15mm rod system, then prioritizing your comfort through a quality shoulder pad positioned for natural weight distribution. Every component you’ve explored in this guide serves a specific purpose: the cage transforms your DSLR into a modular platform, the rods create structural integrity, the shoulder pad enables hours of fatigue-free shooting, and handles give you precise control over every movement. For creators seeking the fastest route to a functional setup, cage to shoulder rig kits eliminate compatibility concerns and deliver everything you need in one purchase, letting you focus on content rather than components. The technical barriers that once separated amateur from professional video have dissolved—you now have the knowledge to assemble a rig that distributes weight properly, accommodates your essential accessories, and moves smoothly through every shot. Your audience won’t scroll past shaky footage anymore because you’ve equipped yourself with the tools that command attention and engagement. Take these essentials, build your rig with confidence, and transform every frame you capture into content that reflects your creative vision without compromise.